| |
|
Click on a thumbnail picture below to see the full size version.
|
82 Entries.
|
|
Thursday, February 20
|
View Page
|
 |
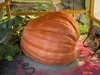
2025 season begins! Looking back on my first attempt at a giant pumpkin in 2022. My 808 Grubbs 19 seed was doing great, growing about 25 lbs a day by the chart when mice ate a hole on the bottom of the pumpkin on about day 50 after pollination. This ended the season in mid August, pumpkin was just under 1,000 lbs by the crane scale. Tried again in 2023 with both plants lost to bacterial disease in late July.
|
|
|
Friday, February 21
|
View Page
|
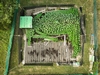
 |
2023 before things went south. Drone view of both plants growing from the center of the garden, one growing to the left, and one to the right. This was taken just before pollination.
|
|
|
Saturday, February 22
|
View Page
|
 |
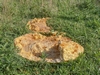
2023s season ended here, rot setting in at the blossom end, not sure where this came from, best guess is that it was in the soil from last year.
|
|
|
Saturday, February 22
|
View Page
|
 |
A closer look at 2023s dead pumpkin. Plan analysis was sent to the lab...
|
|
|
Saturday, February 22
|
View Page
|
 |
Western Laboratory analysis showed high pseudomonas, I am assuming this was the culprit, but not sure why, plan was dry and little rain, using drip irrigation. Has anyone else delt with something like this?
|
|
|
Sunday, February 23
|
View Page
|
 |
2024. I didn't try to grow pumpkins last year, instead gave the patch a break and tried to eliminate any disease in the soil. Starting with hydrogen peroxide. Ran 2 gallons of food grade peroxide through my drip irrigation system from the fertilizer injector at the end of 2023 season.
|
|
|
Sunday, February 23
|
View Page
|
 |
2024. The next step to prepare for the patch for 2025 was solarization. This is a non-chemical way to (hopefully) sterilize the soil using trapped solar heat. Clear plastic covered the entire garden through the summer months to trap heat and try to kill off any pathogens. Mid-summer the plastic sheeting was removed, and the soil was tilled. Then new plastic sheeting was reinstalled shifted over a few feet to cover previously exposed areas.
|
|
|
Sunday, February 23
|
View Page
|
 |
2024. Soil prep continued into the fall with many loads of mulched leaves from the lawn-vac added to the patch. Leaf-mulch was about 6 inches deep. This pic was taken before the mulch was worked into the soil with multiple passes on the tiller. More HP on the tiller would have made this a lot easier. The central area was the last to have the solarization cover removed, and leaves were added here later as well.
|
|
|
Sunday, February 23
|
View Page
|
 |
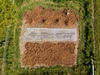
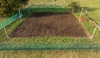
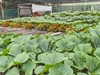
The patch viewed from above as it currently sits at the end of February. I have my potted tulips buried in leaf mulch waiting for spring. Next week should be much warmer and hopefully this is the end of the winter weather.
|
|
|
Monday, February 24
|
View Page
|
 |
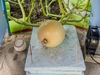
Outdoor tulips are just starting to sprout, meanwhile I had forced these tulips over the winter. Chilled in the crisper on 9/30, planted on January 19th, started to bloom 2/16 just a couple of days late for Valentines Day.
|
|
|
Saturday, March 1
|
View Page
|
 |
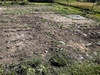
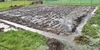
Starting to feel like spring, tilled the garden for the first time this year. Too much leaf mulch remaining where I had the potted tulips buried, which I will have to work on...
|
|
|
Wednesday, March 12
|
View Page
|
 |
In an attempt to reduce disease in the soil I used food grade peroxide diluted to 3 % to saturate the patch. The next day I tilled in Terrogrow to help replace the beneficial bacteria
|
|
|
Friday, March 14
|
View Page
|
 |
Picked up 4 cubic yards of finished compost and worked it in to the patch. Fortunately, the kids helped and we finished before a severe thunderstorm hit, with lots of hail and a tornado to the north of us. No major damage here, but the tulips took a beating from the hail. If this was later in the summer, it would have ended the season. I'm working on a set up for better storm protection this year.
|
|
|
Tuesday, March 25
|
View Page
|
 |
So I decided to try a few different methods for seed sterilization, but the results were less than ideal. Overall germination was poor in all tests even one without any sterilization, but there were a few take aways from the test. I used the ziploc bag and damp paper towel method to be able to view the seeds, and because I was testing so many seeds at once. This was the problem. So Conclusion #1 is don't use wet paper towel and plastic bags, its impossible to get the moisture just right (in my case it was too dry). Conclusion # 2 is that there was no difference in germination using 10% bleach soak, hydrogen peroxide, or the hot water method. Conclusion # 3 there was no difference in germination after sterilization between sanded and unsanded seeds.
The test went as follows. I used 2 different types of seeds for the test one was a very hard/thick shell, the other closer to a field pumpkin seed, a little smaller and softer shell. I used 4 seeds of each type, 2 with sanded edges, and 2 without sanding, so that's 8 total seeds in each type of sterilization method. The different methods tested were hot water bath (130 degrees for 15 min https://projects.sare.org/sare_project/gnc15-217/ ), 3% hydrogen peroxide, 10% bleach/water, 50% bleach/water (for an extreme), and just water for the control. All seeds were totally submerged for 45 minutes (hot water for 15). The 40 seeds were then placed on (apparently not damp enough) paper towels and bagged, then kept in my germination chamber at 85 degrees...
|
|
|
Tuesday, March 25
|
View Page
|
 |
After 6 days, the seeds were checked with poor germination overall, even using just water. The paper towels were completely dry in some cases despite condensation drops on the plastic bag. I added additional water and did get most seeds to germinate after another 3 days with the added water. The exception was with the 50% bleach, in which no seeds germinated. Articles I found show the hot water method to be very effective at sterilizing, but some suggest it might decrease germination rates. I was at least glad to see that in my trial the seeds in the hot water did as well as all other methods. I also found no difference in germination after sterilization between sanded/unsanded seeds, or larger/harder seeds as opposed to smaller/softer seeds. Overall, I would say if you need any more proof not to use paper towels in plastic bags to start seeds, this is it. Also, sterilizing seeds with 3% hydrogen peroxide, 10% bleach solution, or 130-degree water for 15 minutes did not seem to affect germination rates compared to just soaking in water. Finally, soaking pumpkin seeds 50% bleach will definitely kill your seed.
|
|
|
Sunday, March 30
|
View Page
|
 |
With a couple weeks to go until starting my plants, I've about finished putting up the post and cables for a (hopefully) retractable shade cover. The goal is being able to pull over shade cloth when needed, or a tarp when I need to keep things dry or protect from hail. I set 4x4 post in concrete with 1/8-inch steel cable across to be able to slide the cover back and forth. Also put up most of the wind screen but not quite finished with that. Need to work on irrigation set up next so I can get the hoop houses out there.
|
|
|
Saturday, April 5
|
View Page
|
 |
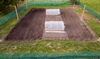
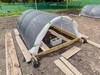
Built two new hoop houses early this spring, complete with all the bells and whistles. Larger size of 10 foot by 6, temperature controlled automatic opening vent on the end, 10-inch pneumatic tires for easy movement using a 2-wheel dolly at the opposite end. The back is removable so it can be easily wheeled off of a larger plant without lifting. Will see how all this actually works out...
|
|
|
Sunday, April 6
|
View Page
|
 |
Solid rain for 3 days, about 6 inches. Lots of flooding in our area so it could have been worse. Fortunately, I had trenched around the patch to divert the runoff before the rain started.
|
|
|
Monday, April 7
|
View Page
|
 |
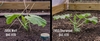
Germination test went 4/4 (with one lagging behind a couple days) in straight seed starter mix, but the mix did dry out quickly in the germination chamber at 85 deg. I'll try one more round with a 50/50 blend of potting soil/seed starter to see if this keeps moisture more consistent.
|
|
|
Sunday, April 13
|
View Page
|
 |
Mini greenhouses are in place. I changed my plan for growing the 2 plants back-to-back in opposite directions at the last minute. With this layout I'll plan on training the secondary vines backwards, adding drip lines as needed and being able to till or rework the soil ahead of the vines. It will take more work in vine management but allow for more access around the pumpkin than in years past.
|
|
|
Monday, April 14
|
View Page
|
 |
Here is the line up for 2025. I'll be growing 2 plants: 2453 Sherwood and 2006 Wolf with a backup of 2085 Toboyek. At 9:30 PM April 14th started soaking seeds and will plant in a mix of 50% seed starter and 50% potting soil first thing in the morning.
|
|
|
Saturday, April 19
|
View Page
|
 |
All seeds germinated and emerged 4/18/25. However, the 2006 Wolf has some damage to the very center of both cotyledons. I have not seen this before, and I'm not quite sure what caused it. Possibly the seed was damaged or crushed in the center during transport? I guess I'll see how it goes, but was really looking forward to growing this one so hopefully it pulls through OK.
|
|
|
Sunday, April 20
|
View Page
|
 |
Day 6 from seed start, 2006 Wolf is just a bit behind the others but has been growing well which is a relief. Current set up keeping air temp in the mid 70's, plants reasonably close to grow lights. Added a fan for some acclimation to wind and help prevent damping off.
Two backup plants started a few days ago on a heat mat with sand around the base as insulation, and a probe thermometer monitoring soil temp in the low 80s. I can fine tune the soil temp by how deep the pots are in the sand. Initially they were buried deeper, and soil temp was at 100 so I had to back them out a bit.
|
|
|
Monday, April 21
|
View Page
|
 |
I have had the hoop houses closed up to warm the soil (no plants inside). After 4 inches of rain in the last couple days today's high was 70 and sunny. Inside the hoop houses heated up to almost 110. That's 40 degrees hotter than the air temperature. This evening I attached the temperature controlled vent and will see if this makes a more hospitable environment tomorrow.
|
|
|
Friday, April 25
|
View Page
|
 |
Two plants in the ground, 2006 Wolf and 2453 Sherwood. Azos and Pumpkin Power mixed in, watered in with Rootshield plus. It's been hot and sunny so I added some shade cloth as they acclimate. Even with the ends open, hoop house temps are around 90 during the day.
|
|
|
Tuesday, April 29
|
View Page
|
 |
More extreme weather. This morning we had some very strong storms pass through with wind gusts of 91 mph. We were fortunate that the worst of it was just a few miles down the road, and our power came back on this evening. A lot of our neighbors will be without power for a while, and I loaned out my generator after our power was restored. There are a lot of trees down but we had no structural damage. Somehow the mini greenhouses survived just fine, and both plants are OK. It's been a rough start to the season so far but the plants are still doing alright
|
|
|
Sunday, May 4
|
View Page
|
 |
Day 20 from start, the 2453 is growing a little ahead of the 2006 which had a little bit of a slow start, but both are doing pretty well. There are already bugs, and voles to deal with but nothing major. The mini greenhouses warm up very fast even when fully open, so I've added some fans for air circulation. I have the back end covered with 30% shade cloth to keep it from becoming a wind tunnel, and also to help each plant grow in the direction of the sunlight at the opposite end.
|
|
|
Saturday, May 17
|
View Page
|
 |
Not quite sure on this one. My 2453 Sherwood, DAS 32. About every other leaf that emerges comes out as a double leaf/ tendril, one on each side of the vine. Related or not, the secondaries are not coming out very strong yet, they are there but very small. Comparing this to my other plant the 2006 Wolf which had a slower start, has outgrown the 2453 and is starting to take off with strong secondaries. My plan is to plant my backup next to the 2453 and see what happens in the next week or so. Havent seen this double leaf thing before, or at least never noticed it. Hopefully the secondaries take off soon.
|
|
|
Monday, May 26
|
View Page
|
 |
Unfortunately, my 2453 Sherwood continued to grow double of everything at each node, and most of the secondaries were growing as flat/ribbon vines. I did have a couple good secondaries that were normal, but this plant had to go. I transplanted it elsewhere in case I decide to cut the main and let a good secondary grow as a pollinator. In its place I have put in my backups, 2085 Toboyek, and 2206 Rodebaugh to battle it out. The 2006 Wolf on the other hand is just about to outgrow the mini green house.
|
|
|
Tuesday, May 27
|
View Page
|
 |
For all the mistakes I've made and will make, one thing that has been an improvement this year was the rolling mini green houses. It's been nice to just roll them back to work on the plant, or on a nice sunny day, then roll them back in bad weather. We had 7 inches of rain in the last two days, and some terrible storms this spring, so these have sure helped.
|
|
|
Wednesday, May 28
|
View Page
|
 |
2006 Wolf has outgrown the mini greenhouse, with the secondaries and main vine reaching the sides at the same time. First baby pumpkin can be seen a couple leaves back but will wait for 17-20 good side vines before pollination, so this one had to be removed.
|
|
|
Monday, June 2
|
View Page
|
 |
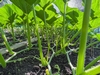
These two plants, like several others have posted, are growing the main vine well, but not secondaries. Secondaries are just a small leaf and a clump of flowers but not really growing. I'm going to do an experiment as John suggested and cut the main vine tip on one of the plants to see if this will spark some secondaries to grow, then turn one of these into the new main.
The long story is, these are backups grown too long in 1 gal pots, were about 3 feet long before being planted. They were root bound in the pots, and I had not fertilized them (lesson one take better care of your backups). They are planted in the same place as my 2453 Sherwood which had a mutation and was pulled out, BUT that plant was growing good secondaries in this soil, so the soil nutrients should not be the issue. I believe the 2 plants without secondaries are a result of growing too long in the 1 gal pots before they were planted. This morning I cut the main vine tip off the 2085 Toboyek (on the left). I'll leave the main intact on the 2206 Rodebaugh (on the right) and we will see how the two compare in the coming days. Fortunately, my other plant the 2006 Wolf is doing great and growing exponentially just a few feet away.
|
|
|
Monday, June 2
|
View Page
|
 |
Another picture, showing the lack of secondaries. Just a clump of little flowers and a small leaf not growing at all, main vine is about 7 feet.
|
|
|
Friday, June 6
|
View Page
|
 |
Update on the secondaries: after cutting the main vine tip 4 days ago, secondaries have started to actually grow as you can see in the pic. The difference was quite noticeable after about 2 days, and the main has a well growing secondary taking over as the new main. However, the plant next to it, which I did not cut the main vine tip has also started growing secondaries all of a sudden as well. I'll keep tracking and see how things compare in the next few days.
|
|
|
Sunday, June 8
|
View Page
|
 |
Patch update for the week: Its rained almost every day, several inches at a time so its been a challenge. The 2006 Wolf is doing well, I am training the vines backward to make more room around the pumpkin. The vine tips want to stay low and drag along the ground so I'm having to keep them propped up out of the mud. If you have any ideas on how to make them reach up more let me know. The other two plants are still slow to grow secondaries, as soon as one takes off I'll remove the weaker of the two. Mainly I need some dryer weather, its just been a swamp.
|
|
|
Monday, June 9
|
View Page
|
 |
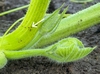
Time to test your pumpkin leaf problem knowledge! The first person to correctly identify this pathogen get 2 points. I will post the answer tomorrow. Bonus points if you know why this is on my plant.
|
|
|
Wednesday, June 11
|
View Page
|
 |
Pollination day for my back up pumpkin. 18 secondaries behind this one, but have another pumpkin about 5 days out that will be my primary choice if all works out. Pollinated this one with my 2085 Toboyek this morning.
|
|
|
Wednesday, June 11
|
View Page
|
 |
This is my primary choice for my 2006 Wolf, probably about 5-6 days away. Starting to train the vine to allow room for pumpkin growth.
|
|
|
Friday, June 13
|
View Page
|
 |
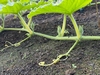
Pumpkin quiz #2. Can you correctly identify this finding at the tip of the arrow? Bonus points if you know how to treat the problem. Answer to be posted tomorrow.
|
|
|
Sunday, June 15
|
View Page
|
 |
Pollination day! Maybe... This 5 lobe opened up this morning which was to be my keeper. There is a type of malformation where seeds can form in the blossom, and lead to a misshapen or split in the pumpkin. I do not have much experience with it personally, but this blossom makes me suspicious. I pollinated it anyway and will see how it looks but there should be another pumpkin opening up in about 4 days so I may go with it instead. Disappointing since I had my vines trained into position for this one.
|
|
|
Monday, June 16
|
View Page
|
 |
Final pic in my test to force grow secondaries by cutting the main vine tip. The 5 closest secondaries to the tip grew like crazy but the ones closer to the stump were still sluggish. A new secondary took over as the main and grew very fast, but this "new main" failed to grow any secondaries. I culled the plant this weekend at about 15 feet and 5 good secondaries. The 2206 that was next to it can now have all the room to grow.
|
|
|
Wednesday, June 18
|
View Page
|
 |
DAP #3 2006 Wolf X 2206 Rodebaugh. 18 feet out 21 secondaries behind it. Pollinated 6/15/25 8:06 AM, cloudy and 65 deg F. Only one flower from the 2206 available to pollinate. With the flower removed I finally got a good look around the base of the stigma and all looks good. Will pollinate a backup tomorrow morning, but this looks like a keeper if it takes.
|
|
|
Friday, June 20
|
View Page
|
 |
One big improvement this year has been the retractable shade/hail netting over the whole patch. So far its holding up well and pretty easy to pull off and on.
|
|
|
Monday, June 23
|
View Page
|
 |
DAP#8. 1,998 lbs to go.
|
|
|
Monday, June 23
|
View Page
|
 |
This year I used potting soil to bury the vines for better control of moisture. I think the roots liked it.
|
|
|
Monday, June 30
|
View Page
|
 |
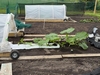
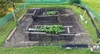
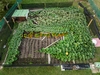
Overhead view of the patch from 2 days ago, all was going pretty well. The rain has washed out most of the nitrogen, and I haven't been able to add much back with continued rain. Pumpkin on the 2006 is growing well so far, and I built a small shed around to block the weather. Then last night a strong storm came through and rolled several vines and I lost some of the larger leaves and ends of the vines. It's just a constant battle with the weather here in Missouri
|
|
|
Monday, June 30
|
View Page
|
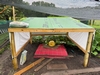 |
This is the pumpkin shelter I put up the weekend. It's 8 ft x 8 ft, and staked into the ground. A tarp/ PVC pipe shelter would never hold up to the storms we have had even with two layers of wind block.
|
|
|
Monday, June 30
|
View Page
|
 |
DAP 14: I have not measured it yet but it's still growing and looking good so far.
|
|
|
Friday, July 4
|
View Page
|
 |
Pollinated the 2206 Rodebaugh with the 2006 Wolf 7/4/25 at 7:25 AM, 72 deg F, an odd shaped 4 lobe. 23 feet out on the main with 20 good secondaries behind it. This was on the secondary vine trained as the "new main" after the original main was cut in an attempt to force secondary growth. I have a backup opening in a few days, but now The plant is at the end of the patch
|
|
|
Friday, July 4
|
View Page
|
 |
2006 Wolf DAP 19 measures at 105 lbs, as I will not have time to measure tomorrow. So far so good.
|
|
|
Saturday, July 5
|
View Page
|
 |
2006 wolf looking really good in early July , recovered well after replanting and bracing the vines after the storm last week. No major leaf problems yet, fan and cover on the stump.
|
|
|
Sunday, July 13
|
View Page
|
 |
Took the family on vacation for a week and came back to this. Split in the stem as well with some rot setting in. Had a lot of rain while we were gone and broken vines and leaves. The pumpkin was kept dry and with a fan on the stem and another fan on the blossom, but none of that matters now. I'll see if I can get something on a secondary, but I think next year I'll plant green beans instead
|
|
|
Friday, July 18
|
View Page
|
 |
All that is left of the pumpkin from my 2006 Wolf, The goats made short work of 200+ pounds of fruit in just a few days.
|
|
|
Sunday, July 20
|
View Page
|
 |
Not sure what happened, but the plants overall were looking good. After loosing the pumpkin I did notice yellowing showing up on the leaves closest to the fruit, likely bacterial infection, less likely YVD.
|
|
|
Sunday, July 20
|
View Page
|
 |
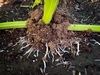
In an attempt to prevent further spread and hopefully keep a pumpkin on a secondary, I cut off the end of the main and several secondaries closest to the fruit. Unfortunately, if there is disease you have to be fairly aggressive and cut off more than you would like. This is a pic of the roots I pulled up from the end of the main vine.
|
|
|
Sunday, July 20
|
View Page
|
 |
Now I'll put my focus on the 2206. This is DAP 16 and growing on a smaller plant with a secondary as the new main after it had a rough start. It also had a pretty good split in the stem which extended to the fruit but is healing over nicely so far. Hopefully I can keep this one going.
|
|
|
Friday, July 25
|
View Page
|
 |
Under canopy view of the 2206. This plant is currently showing no signs of disease. Most vines have almost stopped growing at this point.
|
|
|
Friday, July 25
|
View Page
|
 |
Stump view of the 2006, which unfortunately was pulled out today due to disease. Seemed healthy until the pumpkin aborted after day 20. Could not get any fruit to set, and more vines kept turning yellow and rotting. Stump was healthy with great roots.
|
|
|
Friday, July 25
|
View Page
|
 |
DAP 20 for the 2206. OTT measures at 203 for estimated 196 lbs. This is on a secondary trained as the new main after a rough start. A couple of weeks behind schedule but just hoping I can keep this plant alive and healthy.
|
|
|
Friday, August 1
|
View Page
|
 |
Moved the pumpkin back a few inches today as it was starting to get a kink in the main. Easier to do it now before it gets too big to move.
|
|
|
Sunday, August 3
|
View Page
|
 |
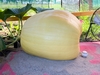
DAP 30 for the 2206 measures 266 inches OTT for estimated weight of 442 lbs. Not my best, but the plant is healthy and doing great, so a PR is still a possibility if it keeps growing well. I do like the color on this one so far.
|
|
|
Wednesday, August 6
|
View Page
|
 |
Since I'm down one plant, I added in some marigolds around the perimeter. Maybe this will help keep some pests away, while adding some color to the patch.
|
|
|
Sunday, August 10
|
View Page
|
 |
DAP 37 measures 294 OTT, estimated about 600lbs. Growing steady and consistent. One new small stem split but drying nicely. Plant continues to look good. Slow and steady.
|
|
|
Thursday, August 14
|
View Page
|
 |
DAP 40 OTT 303 est weight 653lbs. Growing steady but slowing down a little. So far this August has been pretty low maintenance with no storms, very low disease pressure, and a smaller but healthy plant. My biggest problem has been moles. I have tried underground vibration, harpoon traps, and poison worms to no avail. Other than that it is probably the healthiest plant I have had mid-August. Unfortunately it hasn't translated to the biggest pumpkin yet but a PB is still possible by the end of the season.
|
|
|
Monday, August 18
|
View Page
|
 |
DAP 45, 318 OTT estimated at 763 lbs. It's been hot at humid here mid 90's every day and no rain for the last couple weeks. I'm letting the vines keep growing now that I have extra space, hopefully for some better late season gains. It's pretty apparent how much pumpkin growth at this point is dependent on the early season.
|
|
|
Saturday, August 23
|
View Page
|
 |
DAP 50 OTT 329 est weight 833 lbs. Pumpkin growth is slowing down a little at 18 lbs/day over the past 10 days. The plant has a lot of new growth at the farthest ends of the secondaries which I am curving around to fill in the empty space. Minimal disease pressure and leaves looking good. Not quite sure why this doesn't translate to more gains on the pumpkin. Also, the good news is I finally caught the mole. Not with any trap or bait, but dug him out bare handed.
|
|
|
Friday, August 29
|
View Page
|
 |
Measuring your pumpkin in gallons is the cool new trend this year...
|
|
|
Saturday, September 6
|
View Page
|
 |
Visiting wild and wonderful West Virginia today to check out the state where the 2206 Rodebaugh I'm growing began in the WV state record pumpkin... (Also here for some Missouri State football.)
|
|
|
Sunday, September 7
|
View Page
|
 |
Today marks a new giant pumpkin OTT PB for me, as well as the best looking plant I've had in September. Growth has slowed to about 10 pounds a day, but still have 4 weeks to go until weigh off.
|
|
|
Friday, September 12
|
View Page
|
 |
So far a pretty boring September, and trying to keep it that way. Steady growth on the pumpkin, with no major problems. Strong secondary growth and I have decided to let a pumpkin grow on one of the secondaries as a porch pumpkin. It's about 60 feet from the main vine and shouldn't take anything from the big one with the size of this plant. Just have to avoid any disasters for 3 more weeks, slow and steady.
|
|
|
Thursday, September 18
|
View Page
|
 |
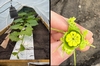
DAP 75 as illustrated by my 6 year old. (She got a 10/10 obviously)
|
|
|
Friday, September 19
|
View Page
|
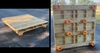 |
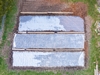
Transport pallet with tiedowns. I added 8 pallet cushions for a weight rating between 1000 and 1800 pounds, (hopefully I will have to add some more next year). Just need to add some foam on the top to finish it off.
|
|
|
Saturday, September 27
|
View Page
|
 |
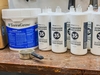
6 days until weigh off. My goal for the plant this year was to keep bacterial disease under control. This picture shows successfully treated downey mildew, much better than previous years. I have mainly used Daconil in the past, which was not very effective. This year I used a mixture of Kocide + Manzate Pro Stick, alternated with Regaila. Also every time I sprayed I added Cease, a biofungacide to colonize the plant and prevent other pathogens from being able to find a home. I also added Natural Wet, a Yucca plant extract/wetting agent. This combination worked significantly better this year. The plant itself also seemed much more resistant to disease which is a likely a significant factor as well.� This spray program was found to be effective in a 2019 study done in Illinois, summarized here:
https://blogs.cornell.edu/livegpath/gallery/cucurbits/bacterial-leaf-spot-on-cucurbits/
|
|
|
Saturday, September 27
|
View Page
|
 |
I had no disease pressure from the soil this year which was an improvement over previous years. If you can rotate fields, or take a year off from growing, I highly recommend soil solarization. Unfortunately to do this right you need to have the growing area covered in clear plastic during the middle of summer. I also rotated a soil drench of Terragrow and RootShield Plus through the drip irrigation.
The oldest leaves of the plant are starting to show their age at this point. I am going to let a few porch pumpkins grow for a couple more weeks after I harvest the pumpkin at the end of next week.
|
|
|
Friday, October 3
|
View Page
|
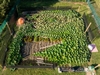 |
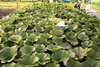
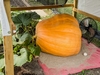
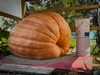
Harvest day is bittersweet, can't wait to get this thing to the scales before the next disaster but at the same time it's still growing well and I've enjoyed keeping it going. One last overhead shot before we load it up!
|
|
|
Friday, October 3
|
View Page
|
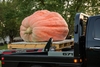 |
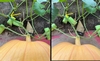
Loaded up and ready to go! Good luck to everyone this weekend!!
|
|
|
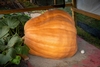
Saturday, October 4
|
View Page
|
 |
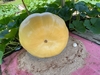
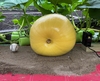
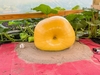
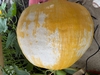
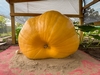
Made it to the scales in one piece. It was a tough year to grow in Missouri this year, but still had a great turnout for Republic Pumpkin Daze. No records broken but, did have the heaviest pumpkin today! 1241 lbs, a new official PB.
|
|
|
Sunday, October 12
|
View Page
|
 |
I have let a couple pumpkins grow on the side vines at the end of the season, this one measures about 400 lbs around
DAP 40, but unfortunately had a BES a couple days ago.
|
|
|
Sunday, October 12
|
View Page
|
 |
I have heard these swollen looking blossoms often lead to BES which was the case here. I sealed up the split to see if it can get a little more orange before it rots. Typically, I wouldn't recommend pollinating one that looks like this, but at the end of the season I'm just growing a few for display.
|
|
|
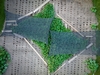
Sunday, October 26
|
View Page
|
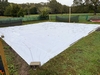 |
After a rain delay, patch cleanup is now complete. Tarping the field kept things dry before I had time to till the patch and plant Kodiak mustard as a cover crop.
|
|
|
Monday, October 27
|
View Page
|
 |
2025 is in the books.
|
|
|
Friday, November 28
|
View Page
|
 |
Harvested the seeds from my 1241 late November, about 300 total but mostly white tipped. Walls of the pumpkin were nice and thick all around. I was surprised how well it held up with no signs of rot this long after harvest.
|
|
|
|