|
Thursday, January 16
|
View Page
|
|
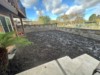
Finished spreading 50 lbs of Mustard Meal Pellets and 100 pounds of ground Mustard Meal. This is my second (and final) mustard meal application in the offseason. I watered it in until a crust developed to seal in the gas.
This is a great alternative to planting mustard for disease management. I have very little sunlight in the patch in the winter so growing mustard has had limited success. I have noticed that the meal works very well for weed suppression.
One caution: I managed to get some of the ground meal between my shoe and my foot. Once it got some moisture there, I found out that it burns like hell. Don't get this stuff on your skin. It's hot enough to make your skin blister!!
|
|
|
Tuesday, January 21
|
View Page
|
 |
For those of you curious about the mustard meal, it is both a biological fungicide as well as a fertilizer. I've added quite a bit of it for a small patch, and will have to reconcile the nutrients in the spring.
I like the fact that it's got some sulfur in it because it seems like I am always chasing that element.
|
|
|
Friday, February 7
|
View Page
|
 |
Got this in the mail today. Very cool to share this award with so many great growers! Thanks Cindy for getting this to us.
|
|
|
Saturday, February 8
|
View Page
|
 |
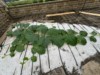
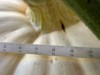
Been about three weeks since the mustard meal was applied.
We have had a couple light rains and the following days I've noticed this white mold on the surface. It looks almost like a layer of perlite.
The factory rep says this is a good sign that the mustard is working.
|
|
|
Sunday, March 9
|
View Page
|
 |
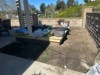
I am expanding my patch this year such that it is lol. I've removed the cage. I built for growing tomatoes. Seems like the critters still managed to find a way in whether it was under or over.
This area will give me room to run out a couple of long vines past the fruit. You can see I've started excavating out the old soil. Not only is it full of clay, it is also full of Verticillium wilt. There's not much you can do about Verticillium wilt. It lasts for 10 to 15 years in the soil. There are no chemical products that really will control it. I will spray the bottom and sides of this trench with a high concentration of Hydrogen peroxide before putting in new dirt.
|
|
|
Monday, March 10
|
View Page
|
 |
This L-shaped area is going to be my new 150 square-foot patch. I've grown in this area before but only in about 60 ft.�. Last year I managed to get a 441 pounder out of less than half of this spot. Like the other spot, I've grown tomatoes here for a long time and it's full of grubs, verticillium wilt and just needs a fresh start. I will excavate it out also.
|
|
|
Tuesday, March 11
|
View Page
|
 |
My nematode test came back from Western lab. I was glad to only see two different types of nematodes on the list. Based on what I've read the pin nematodes are a potential risk as they feed on root tips. Does anyone have any guidance on this?
|
|
|
Tuesday, March 25
|
View Page
|
 |
The excavation is complete. My wife and I dug out over 4 tons of dirt and hauled it to the landfill. Nasty clay.
This area is only 70 ft.� but it will allow me to extend the main patch and specifically grow out vines near the fruit.
|
|
|
Tuesday, March 25
|
View Page
|
 |
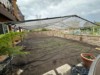
This is the other side and will ultimately be about 130 ft.�. That's double what I grew in last year here. I've got the ramp in place to wheelbarrow the new soil down into the hole. This area is a little wider so I will be able to let some side vines grow out.
|
|
|
Tuesday, March 25
|
View Page
|
 |
It's here. And it's wonderful. A rich sandy loam. A sample is already in the mail to get tested.
|
|
|
Tuesday, March 25
|
View Page
|
 |
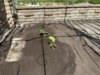
For the next phase, I took my broad Fork and broke up the bottom of the trench. I sprayed it down with a hydrogen peroxide solution mixed at a 50:1 ratio.
It will be a few days before I get the soil test back, but in the meantime, I layered in a good amount of perlite, a little bit of alfalfa meal, and a little bit of kelp meal. I also sprinkled in a little gypsum in the bottom of the hole.
I don't need a soil test to tell me I will need all of these things in some quantity.
|
|
|
Wednesday, March 26
|
View Page
|
 |
My wife and I have been filling in the new patch for the past couple days. I'd say we have moved about 7 of 10 yard so far.
This soil was sourced from a grading contractor in Chino,California Before land got so valuable, Chino was the dairy capital of the country. As a result there is a la good amount of decades old manure in it.
|
|
|
Saturday, March 29
|
View Page
|
 |
Holy smokes!
|
|
|
Monday, March 31
|
View Page
|
 |
We sure can overcomplicate things in our seed starting efforts. These baby squash plants were germinated from seeds with no soaking and no sanding and nothing in the mix. Even the seats starting mix is basic. It's just Jiffy Mix from Home Depot.
These are just test pilots to practice germination techniques or they would've been transplanted by now. But they are nice and healthy seedlings so that's a good thing.
|
|
|
Tuesday, April 1
|
View Page
|
 |
Seed starting day! Hello 2025!!
|
|
|
Tuesday, April 1
|
View Page
|
 |
In the dirt after a short soak.
|
|
|
Saturday, April 5
|
View Page
|
 |
First of the seeds germinated today! 4 days since planting.
|
|
|
Tuesday, April 8
|
View Page
|
 |
In an effort to decrease the algae buildup in my tank, i painted it black. The next step will be to wrap it in bamboo. Mostly for aesthetics but will also keep the tank shaded.
|
|
|
Tuesday, April 8
|
View Page
|
 |
I left one corner unpainted so the water level is visible.
|
|
|
Tuesday, April 8
|
View Page
|
 |
Added a gauge that is visible from a distance.
|
|
|
Thursday, April 10
|
View Page
|
 |
The bamboo screen is installed. How do you like it?
This stuff comes in 16' rolls which is about 3' longer than needed. Instead of cutting it and risking it unraveling, I just double backed on one side.
The roll even comes complete with enough zip ties to do it twice over so that's cool.
|
|
|
Friday, April 11
|
View Page
|
 |
We have this Camelia plant right outside our back door. It's over 30 years old now. Can you find the guests?
|
|
|
Saturday, April 12
|
View Page
|
 |
Laid out the drip tape today. Marking the cut lines on the concrete makes it really easy.
|
|
|
Sunday, April 13
|
View Page
|
 |
Today they are perched on the rim of the nest. Looks like they are about ready to leave.
Momma was not happy about me taking this picture.
|
|
|
Saturday, April 19
|
View Page
|
 |
The patch is nearly complete. I haven't been using a misting system for the past few years, but it feels like it's going to be a hot summer here. After talking with some of the guys at the international convention, I decided to rebuild it and have it ready for the heat.
I added about 25% more misting lines than in previous years so that the system has better coverage.
|
|
|
Sunday, April 20
|
View Page
|
 |
Happy Easter! Plants went in the ground yesterday April 19th. 2144 Barron backed up by the 906 Donahue (1791 Werner x 2469 Daletas)
|
|
|
Saturday, April 26
|
View Page
|
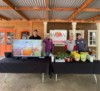 |
We had our annual new growers seminar this last Saturday. About 30 people attended. This is our 7th annual event. All growers left with a seedling, a door prize from WallaceWow, and a seed packet or two. Thanks to SoCalGrower, Chris Dunn, Kevin M, and Janet for teaching your skills.
Also a Huge thank you to Ron for sponsoring us once again!!!
A fun thing we tried was to give an extra ticket to anyone joining BigPumpkins as a premium member. Hopefully we got a few new members!!
|
|
|
Wednesday, April 30
|
View Page
|
 |
Today I noticed my young plants in the 600 square foot patch were flagging badly. What the heck? It's not hot- 73 degrees.
Not a lack of water either.. So what is it?
|
|
|
Thursday, May 1
|
View Page
|
 |
I have a flowerbed plant also, the 2147.5 Sippel. This plant looks fantastic.
|
|
|
Thursday, May 1
|
View Page
|
 |
I measured the soil temperature in each area- the new patch is under 40% shade cloth.
Soil temperature was about 73-74 degrees.
|
|
|
Thursday, May 1
|
View Page
|
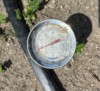 |
Then I checked the temp in the 600 square foot patch.10 degrees hotter!!
|
|
|
Thursday, May 1
|
View Page
|
 |
This is what I believe is the culprit- old and stretched out shade cloth. It doesn't really look worn out per se, but this 30% aluminet fabric has been stretched so many times that it's lost its effectiveness. Look how porous it is!
|
|
|
Thursday, May 1
|
View Page
|
 |
Here's another visual. I strung up a piece of 40% shade cloth temporarily underneath the 8 year old 30% aluminet.
A full 10 degree difference between the two shaded areas.
|
|
|
Thursday, May 1
|
View Page
|
 |
Both plants bounced right back after I strung up the extra layer of shade cloth. I've ordered a replacement shade cloth and it should be here in a day. Glad to find this out early in the season as that extra heat is just that much more magnified as the temperatures rise.
The plant on the left is the 2144 Baron and that will be my go to unless bad things happen. The other plant is my own 906. Really just a placeholder.
|
|
|
Thursday, May 15
|
View Page
|
 |
Well, it finally happened. In my 14th year, I finally had some critter chew through my main vine. Fortunately, this was on the back up plant. Unfortunately whatever critter now has a taste for Atlantic giant pumpkin vines, and Will. No doubt be back.
??
|
|
|
Friday, May 16
|
View Page
|
 |
And this is my first line of defense. I mixed a concoction of hot chili oil with an emphasis on hot. This flash bang sauce has a Scoville rating of 3 million. It's made from Carolina reapers and scorpion peppers. It is the 13th hottest sauce in the world.
This bottle is old. But the sauce is still freaking hot and I think this will work. This product has been rebranded as LD 50. The LD stands for lethal dose.
|
|
|
Saturday, May 17
|
View Page
|
 |
In addition to spraying the plant with the pepper solution, I applied a layer of ground chili peppers all over the vine and on the ground around the plant.
I make this product out of dehydrated peppers that I've grown in my yard
We use it on most everything we eat lol but now it's got a new use to repel vermin!
|
|
|
Monday, June 2
|
View Page
|
 |
The Barron plant has me frustrated. Its secondaries are developing sporadically. Only a third are growing out.
Any ideas what might cause this? Overall the plant just isn't perky. I'm used to seeing the leaves cupped upward, particularly in the morning. These leaves are flat all the time. Not bloated mind you- just not perky.
|
|
|
Friday, June 13
|
View Page
|
 |
Pollination Day! Five lobe flower; a little wonky but not bad. She's at about 18'.
|
|
|
Saturday, June 14
|
View Page
|
 |
The good news is that the 2144 plant has grown out of its early funk and secondary development is, for the most part normal now. Whew!
tissue and soil samples have been sent out.
|
|
|
Monday, June 16
|
View Page
|
 |
The 2147.5 Sippel is throwing a little freak/ this half bloom is on the bottom of the vine.
|
|
|
Monday, June 16
|
View Page
|
 |
And another - if this was a tomato, I might be excited!
I am not. Lol
|
|
|
Tuesday, June 17
|
View Page
|
 |
OK, here's a fair warning. You might wanna look away,
By popular demand, here is a photo of the Freakazoid female stigma!
|
|
|
Wednesday, June 18
|
View Page
|
 |
It's pollination day on the 2147.5 Sippel that is growing in the flower bed. Beautiful five lobe flower this morning. This is the same plant that threw the Bloomzilla 2 days ago.
This is the area that was completely rehabilitated over the winter, hauling out the clay soil and bringing in soil from the historical dairy farms. This plant will only have around 130 ft. but I am excited to see what it can do. The bloom landed in the perfect spot.
|
|
|
Wednesday, June 18
|
View Page
|
 |
I don't know why people think gardening is hard. I've got tomato plants for weeds.
This one was no doubt created when a rat dropped a tomato fueled poop in the crack.
|
|
|
Wednesday, June 18
|
View Page
|
 |
So I can just ignore the little guy. Or worse yet pull it out. It's got blossoms for gosh sake.
So I got out some super starter paks and stuck them in the crack.
|
|
|
Thursday, June 19
|
View Page
|
|
For good measure, I filled in the gap with some good potting soil.
Let's see what happens!!
|
|
|
Saturday, June 28
|
View Page
|
 |
Henry, the crack tomato plant is doing great! If you look close, you can see that he's now bearing some fruit. It looks to be a cherry tomato variety, but the jury is still out.
I customized a tomato cage just so he wouldn't get run over.
Turns out all he needed was a little love!
|
|
|
Sunday, June 29
|
View Page
|
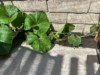 |
More crack gardening- the flowerbed plant sent some vines along the wall. I filled in the gap between the wall, the sidewalk, and the footing with some soil to let them run. Hey, maybe I will get a pound or two out of it!
This is how we do it in the burbs!
|
|
|
Thursday, July 3
|
View Page
|
 |
Things are going well in the patch. The 2144 plant has had its challenges. First it wouldn't grow secondaries. Once it got to 14 feet or so it started to normalize.
I've got one going at 18 feet out that I selfed. It as the next one that I wanted to grow because of the cross but it wasn't to be. Once this one got its sink on, the second fruit never grew. At the same time, all the late growth just STOPPED. All vines at the front of the plant self-terminated.
|
|
|
Thursday, July 3
|
View Page
|
 |
In the flowerbed patch, the 2147.5 Sippel has a nice fruit growing. Going to be nice and Orange! This plant has been great. Throws a ton of roots!
|
|
|
Tuesday, July 8
|
View Page
|
 |
Second tissue/soil test came back. Can't believe how much my N is still rising. I can only attribute it to the mustard meal still breaking down.
Still got some work to do to get the Mn and Cu back up. The zinc isn't getting into the plant despite copious amounts in the soil. Maybe that's the high locking them out.
|
|
|
Wednesday, July 9
|
View Page
|
 |
Every year I have to deal with spider mites. For such little guys they do a lot of damage. I've just read that high nitrogen is attractive to mites so it's no wonder they are here early.
This photo shows the top of a leaf infested with them. Those white dots are a tell tale sign.
I've treated the plant with Avid three times over the past nine days. This is the only way to interrupt their life cycle. Fortunately, I caught this early and only a couple of leaves got infested.
|
|
|
Wednesday, July 9
|
View Page
|
 |
Day 25 for the 2144 Baron. It's growing well but not spectacular. Still early!
|
|
|
Thursday, July 10
|
View Page
|
 |
I happen to be reading a 10 year-old diary entry from Ian Paton yesterday. He was talking about checking the pressure at both ends of the system to make sure that the patch was watering evenly. The recommendation was to put test containers under the drip line to determine if the front of the system was watering in the same volume as the back of the system. Here's what the front of the system was putting out:
|
|
|
Thursday, July 10
|
View Page
|
 |
I put small plastic tubs under the drip line so that one emitter was over the top of the container.
|
|
|
Thursday, July 10
|
View Page
|
 |
This photo shows the amount of water from the far end of the system. Clearly there is not enough pressure to maintain even watering. The volume was less than half at the end of the system than at the front.
The reality is, I should've tested all of this before the plant ever went in, but best laid plants right?
Each one of my drip lines has its own valve so I can tinker with partially closing some of the early lines so that the water volume evens out. Alternatively, I can a) hand water the far side of the patch or b) get a bigger pump.
|
|
|
Thursday, July 10
|
View Page
|
 |
One of the really fun parts about growing in my backyard is that every morning I can look out the kitchen window and see how the Pumpkin is doing. So great!
|
|
|
Monday, July 14
|
View Page
|
 |
The 2147.5 Sippel is starting to kick in now. Plant looks great. Hoping for 600 lbs in the flowerbed.
Day 25
|
|
|
Monday, July 14
|
View Page
|
 |
The 2144 has not hit its stride yet. Still hopeful for 40 lbs days. Looking like she will grow over the blossom end. Haven't dealt with that before.
|
|
|
Monday, July 21
|
View Page
|
 |
Uh oh.
|
|
|
Monday, July 21
|
View Page
|
 |
Got on the phone with Dave Chan and he walked me through the process. He made sure to give credit to Glenn for teaching him how.
Here is a photo post incision:
|
|
|
Monday, July 21
|
View Page
|
 |
Finally, I inserted an air line into the gap. Credit to Ruben Mendi for this trick!
|
|
|
Tuesday, July 22
|
View Page
|
 |
Time to move the pumpkin. Every year it seems like I've gotta pull it in a different direction and have to install a new anchor point.
|
|
|
Friday, August 1
|
View Page
|
 |
Stem split is doing exactly what it is supposed to do- widening but not lengthening.
|
|
|
Sunday, August 3
|
View Page
|
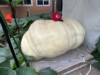 |
Day 50 she's not lighting up the charts but I love the shape. She feels thick. About 900 lbs now. I'd be stoked if this one goes 1400-1500 lbs.
Wouldn't be a PB but that's a very good weight for Southern California.
|
|
|
Tuesday, August 5
|
View Page
|
 |
The Sippel plant growing in the flowerbed has produced a very pretty fruit. Getting close to 500 lbs now on Day 47. Growing in 130 square feet.
|
|
|
Tuesday, August 5
|
View Page
|
 |
We've got a short heat wave coming after what was a very cool July. Turned up the water just a bit to account for the increased transpiration and evaporation.
|
|
|
Thursday, August 14
|
View Page
|
 |
The 2144 Barron is growing well, although not spectacular. It's rolled over and the only way I can see the blossom end is to stick my cell phone underneath. I love the shape for going heavy.
OTT is 365 inches. Day 60 today 37 days to go until the Weigh Off.
|
|
|
Thursday, August 14
|
View Page
|
 |
The 2147.5 Sippel keeps plugging away. It's about 600 lbs today. Doing about 15 lbs per day. It's 55 dap today. Nice orange fruit.
This cross has great promise. 2147.5 x 2144.
|
|
|
Thursday, August 14
|
View Page
|
 |
These dang things keep popping up all over the patch. Drives me crazy but they suck energy so I gotta keep at them.
|
|
|
Tuesday, August 19
|
View Page
|
 |
Henry the crack tomato plant is producing. I believe this is a Sungold hybrid that I had in the yard last year. Can't believe how well this plant has done in a 1.5" crack!! All I did was throw in a couple Super Starter Paks.
|
|
|
Wednesday, August 20
|
View Page
|
 |
This is the bottom of the 2144 Baron plant. It's thick back here. Because it rolled over its blossom end, I've got to get down on my hands and knees and slide my phone under it to get a photo of the button.
Have you ever wondered if your pumpkin is growing, but not showing up on the tape? I mean, is it possible for there to be growth happening without an increase in the OTT?
In this rare exception there is. As this gap fills in with pumpkin, it would not show up under cc or side to side or front to back.
It's also a note that this big gap is sort of like having a concave bottom on your fruit The OTT doesn't take into account. The fact that there is a huge gap of probably 75 pounds that are lost here.
|
|
|
Wednesday, August 20
|
View Page
|
|
So far this knob does not seem problematic although it looks like it could be squeezed from the side.
|
|
|
Wednesday, August 20
|
View Page
|
 |
Photo from prior post. App force-closed when trying to add it.
|
|
|
Thursday, August 21
|
View Page
|
 |
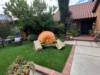
Man do I hate coming out to the garden in the morning and finding my crop destroyed!
|
|
|
Thursday, August 21
|
View Page
|
 |
Got the little bugger! The Squirrelnator did its job.
Relocated this one well away from my garden. Hope it tells the others to stay away.
|
|
|
Friday, August 22
|
View Page
|
 |
Day 70 for the 2144 Baron. 383" OTT 1283 lbs est.
Average is 16-17 lbs over the last 10 days. Lifting day is 4 weeks away. I'm hoping she gets over 400 inches and goes heavy. She sure looks the part.
|
|
|
Friday, August 22
|
View Page
|
 |
View from the back. She is thick in the butt!
|
|
|
Friday, August 22
|
View Page
|
 |
The 2147.5 has all but shut down. Unlike the Baron plant, this plant has no shade cloth and gets more sun exposure. We are having a nasty heat wave, and it may have really knocked this down. It's taping at 699 lbs.
Day 65
|
|
|
Sunday, August 24
|
View Page
|
 |
Last test results are back. For those not familiar,This is the output from Western Labs secret vault program.
|
|
|
Sunday, August 24
|
View Page
|
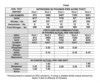 |
This is the recommendation based on the lab results. For the life of me I don't understand some of them. For instance, the soil is chock full of zinc. Why would the lab have me adding more?
I'm also not a fan of the lab using a different unit of measure compared to their regular soil test. And they also don't provide soil Ph for the SV tests except for the preseason reports.
|
|
|
Thursday, August 28
|
View Page
|
 |
DAP 75 for my 2144 Baron fruit. It's gained 19 lbs a day in the last 5 days and that's very good for this patch. Taping 393" OTT for an estimated 1380 lbs.
|
|
|
Thursday, August 28
|
View Page
|
 |
Kitchen window view.
|
|
|
Thursday, August 28
|
View Page
|
 |
DAP 70 for the 2147.5 Sippel. She's taping about 750 pounds now. Love the color and shape on this one. Starting to see some stretch marks, which is always a good thing.
This fruit has exceeded my expectations for a 130 square foot plant. Very happy with this one!
|
|
|
Thursday, August 28
|
View Page
|
 |
Stretch baby!
|
|
|
Thursday, August 28
|
View Page
|
 |
Time to build a big-ass pallet. It's not that this pumpkin is all that big but it is super wide in both directions.
|
|
|
Friday, August 29
|
View Page
|
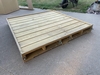 |
This custom pallet design is posted here on bp. I want to know why the pallet has this edging around the top. What function does it serve? It seems a flush surface would be a better call. Thoughts?
|
|
|
Friday, August 29
|
View Page
|
 |
I decided I am going to put skid mates on the bottom of the pallet. The trailer I rent has terrible suspension, if any.
I thought I was going to have to buy a case but they sell sample packs of 4 for $22.
https://skidmatesnow.com/products/orange-skidmate-with-t-nut-4-piece-trial-pack?pr_prod_strat=e5_desc&pr_rec_id=2d3a69178&pr_rec_pid=9806077722919&pr_ref_pid=9805231161639&pr_seq=uniform
|
|
|
Friday, August 29
|
View Page
|
 |
The flowerbed fruit was growing into the side of the bench. Ugh
So we moved it!
|
|
|
Sunday, August 31
|
View Page
|
 |
All the lumber is cut and construction has begun.
I use a nail gun to pre-assemble.
I'm following the plans posted here on BigPumpkins.com.
|
|
|
Sunday, August 31
|
View Page
|
 |
These aren't in the plans, but I added tiedowns to both sides. They come with screws and bolts. Screws are pointless here and the bolts were too short so I bought longer ones. This will make it much easier to strap down the pumpkin.
A good choice was to install these before putting the top crossmembers on. Made it much easier.
|
|
|
Monday, September 1
|
View Page
|
 |
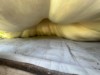
The basic construction is complete. Next step is to add the insulation.
|
|
|
Monday, September 1
|
View Page
|
 |
I used big zip ties to hold the insulation in place. Seems to work good! The only other step is to add the skid mates.
|
|
|
Tuesday, September 2
|
View Page
|
 |
DAP 80 for the 2144 Barron. Happy with the late growth- 19 lbs a day in the last 10.
I had to release a node root on the main vine near the fruit as the vine was really stressed at the stem. Hated to do it, but it had to be done.
17 days until harvest!
And she will be called "Fat Bottomed Girl" because she has a bodacious booty!
|
|
|
Tuesday, September 2
|
View Page
|
 |
Have to slide my phone under the backside to see the blossom end. Still looks ok!
|
|
|
Tuesday, September 2
|
View Page
|
 |
The 2147.5 Sipple has slowed way down. Disease got the plant. DAP 75 and est weight is 782 lbs.
|
|
|
Saturday, September 6
|
View Page
|
 |
Got the skid mates attached to the custom pallet.
|
|
|
Saturday, September 6
|
View Page
|
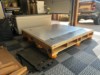 |
Finished product. Really happy with how this turned out!
Adding the skid mates has an additional benefit of turning this into a two-way pallet.
|
|
|
Friday, September 12
|
View Page
|
 |
DAP 90 and one week until the crane comes to lift her over the house.
She's slowed down, adding 7" since Day 80. I will take it. She has fun colors and maybe she will go a little heavy!? Certainly the Barron seeds are known for that.
|
|
|
Sunday, September 14
|
View Page
|
 |
Once a year patch photo. This is my gal and I.
Sorry for the incorrect pose. I will do better.
|
|
|
Thursday, September 18
|
View Page
|
 |
We had a family naming contest for the 2147.5 Sippel x 2144 Barron.
The winning entry: Sponge Bob Orange Pants!
|
|
|
Thursday, September 18
|
View Page
|
 |
She's not been putting on much in the way of inches but she is growing as evidenced by the stretch marks. Crane comes tomorrow and she will be 92 days old at harvest.
|
|
|
Friday, September 19
|
View Page
|
 |
It's crane day! One of the most fun days for a grower is harvesting their fruit. Picked up the trailer yesterday. U-Haul has a new toy hauler and this is perfect for hauling pumpkins. I won't have to fight with the tiedowns between the sidewalls.
|
|
|
Friday, September 19
|
View Page
|
 |
Strapped up the small one while we waited for the crane to come.
|
|
|
Friday, September 19
|
View Page
|
 |
Bottom looks good on both fruit!
|
|
|
Friday, September 19
|
View Page
|
 |
Up and over the house
|
|
|
Friday, September 19
|
View Page
|
 |
Loaded up!
|
|
|
Friday, September 19
|
View Page
|
|
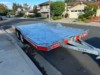
Trailer shot. When I saw this pic I couldn't believe I got these two amazing fruit from just 730 square feet of dirt.
|
|
|
Friday, September 19
|
View Page
|
 |
Photo added
|
|
|
Saturday, September 20
|
View Page
|
 |
The 10th Annual Irvine Park Railroad Great Pumpkin Weighoff is in the books! The 2144
Barron is now the 1515 Donahue.
|
|
|
Sunday, September 21
|
View Page
|
 |
The last thing I wanted to do today was move pumpkins! But you gotta do what you gotta do right? Set up the tripod to offload the Donahue 788.
|
|
|
Monday, September 22
|
View Page
|
 |
Off the truck and into the yard
|
|
|
Tuesday, September 23
|
View Page
|
 |
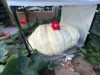
Fall display with the 788 Donahue. This fruit went 4% heavy and is an interesting cross. I'm looking forward to growing this seed. 2147.5 Sippel x 2144 Barron
|
|